モチベーション
最近よく後輩にコントローラ関連で質問されることが多くて、部内向けwikiに記事を書いたのですがせっかくなのでブログ用に載せてみます。
USB Host Shieldのすごいところ
github.com
コントローラーを使用するときに使うUSB Host Shield2.0ライブラリは更新頻度が高く、最近ではDualSense(PS5コントローラ)やSwitchProが対応されています。
もちろん昔ながらのwiiのコントローラやDual Shockシリーズなど使えます。
市販のコントローラならなんでも使えると思ってもらっても大丈夫です笑
必要なもの

やり方
1.platformIOをインストールとプロジェクトの作成、Lチカ
VSCodeのプラグインであるPlatformIOをインストールして、プロジェクトの作成、Lチカなどを以下のサイトを参考にして頑張ってください。
qiita.com
Arduinoを開発するときにArduino IDE使う場合が多いと思いますが、Arduino IDEが使いづらいこととUSB Host Shieldのライブラリを使おうとするとメモリが足りないなどの警告が出るので、PlatformIOを使います。使い慣れればPlatformIOの方が使いやすいです。ひとまず上記のサイトを見ながらuploadの部分までやって、Lチカできるか確かめてください。
2.platformio.iniの書き換え
VScodeの左側にあるplatformio.iniにボードの定義や依存するライブラリを書き加えます。
以下のように書き換えてください。
; PlatformIO Project Configuration File
;
;   Build options: build flags, source filter
;   Upload options: custom upload port, speed and extra flags
;   Library options: dependencies, extra library storages
;   Advanced options: extra scripting
;
; Please visit documentation for the other options and examples
; https://docs.platformio.org/page/projectconf.html

[env:uno]
platform = atmelavr
board = uno
framework = arduino
monitor_speed = 115200
3.ライブラリの追加
github.com
githubのページからライブラリをクローンします。DownloadZIPを押してダウンロードしてください。
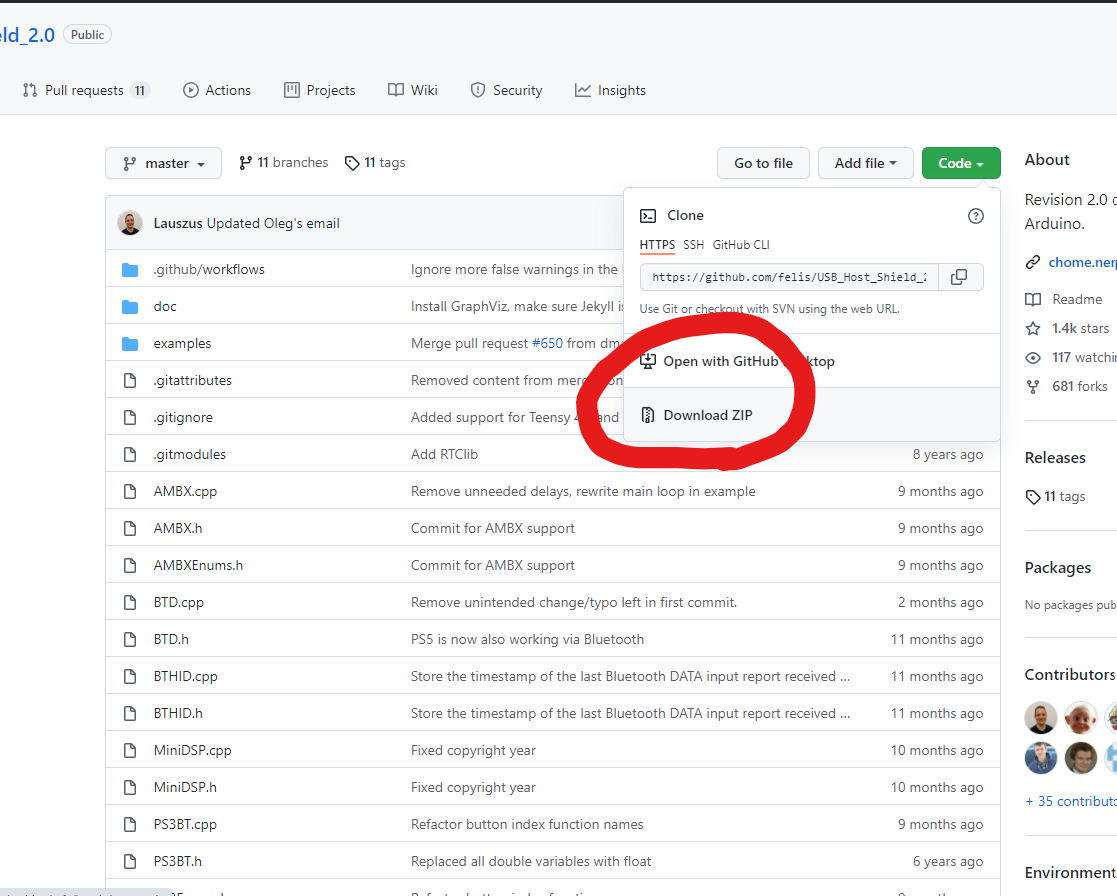
ダウンロードが終わったら、解凍してワークスペースのlibにドラック&ドロップして追加してください。

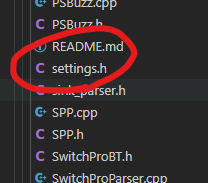
3.settings.hの変更
さきほど追加した中にあるsettings.hの中身を変更します。
////////////////////////////////////////////////////////////////////////////////
// DEBUGGING
////////////////////////////////////////////////////////////////////////////////

/* Set this to 1 to activate serial debugging */
#define ENABLE_UHS_DEBUGGING 1
ファイルの中から上と同じような部分を見つけて、ENABLE_UHS_DEBUGGING 0をENABLE_UHS_DEBUGGING 1に変更してください。
これをすることによって、コントローラをデバックができるようになります。
逆にここを変えないと一生コントローラー使えません笑
3.サンプルコード実行
サンプルコードがあるlib/USB_Host_Shield_2.0/examples/Bluetooth/PS5BT/PS5BT.inoをsrc/main.cppにコピペしてください。ここでのサンプルコードはArduinoIDE向けのサンプルコードであって、PlatformIO用ではないので、必ず#include <Arduino.h>をインクルードしてください。
ちなみにこのexampleの中に入っているコントローラーならなんでも動きます。
一応自分がやったサンプルコードを載せておきます。
#include <Arduino.h>
#include <PS5BT.h>
#include <usbhub.h>

// Satisfy the IDE, which needs to see the include statment in the ino too.
#ifdef dobogusinclude
#include <spi4teensy3.h>
#endif
#include <SPI.h>

USB Usb;
//USBHub Hub1(&Usb); // Some dongles have a hub inside
BTD Btd(&Usb); // You have to create the Bluetooth Dongle instance like so

/* You can create the instance of the PS5BT class in two ways */
// This will start an inquiry and then pair with the PS5 controller - you only have to do this once
// You will need to hold down the PS and Share button at the same time, the PS5 controller will then start to blink rapidly indicating that it is in pairing mode
PS5BT PS5(&Btd, PAIR);

// After that you can simply create the instance like so and then press the PS button on the device
//PS5BT PS5(&Btd);

bool printAngle = false, printTouch = false;
uint16_t lastMessageCounter = -1;
uint8_t player_led_mask = 0;
bool microphone_led = false;
uint32_t ps_timer;

void setup() {
  Serial.begin(115200);
#if !defined(__MIPSEL__)
  while (!Serial); // Wait for serial port to connect - used on Leonardo, Teensy and other boards with built-in USB CDC serial connection
#endif
  if (Usb.Init() == -1) {
    Serial.print(F("\r\nOSC did not start"));
    while (1); // Halt
  }
  Serial.print(F("\r\nPS5 Bluetooth Library Started"));
}

void loop() {
  Usb.Task();

  if (PS5.connected() && lastMessageCounter != PS5.getMessageCounter()) {
    lastMessageCounter = PS5.getMessageCounter();

    if (PS5.getAnalogHat(LeftHatX) > 137 || PS5.getAnalogHat(LeftHatX) < 117 || PS5.getAnalogHat(LeftHatY) > 137 || PS5.getAnalogHat(LeftHatY) < 117 || PS5.getAnalogHat(RightHatX) > 137 || PS5.getAnalogHat(RightHatX) < 117 || PS5.getAnalogHat(RightHatY) > 137 || PS5.getAnalogHat(RightHatY) < 117) {
      Serial.print(F("\r\nLeftHatX: "));
      Serial.print(PS5.getAnalogHat(LeftHatX));
      Serial.print(F("\tLeftHatY: "));
      Serial.print(PS5.getAnalogHat(LeftHatY));
      Serial.print(F("\tRightHatX: "));
      Serial.print(PS5.getAnalogHat(RightHatX));
      Serial.print(F("\tRightHatY: "));
      Serial.print(PS5.getAnalogHat(RightHatY));
    }

    if (PS5.getAnalogButton(L2) || PS5.getAnalogButton(R2)) { // These are the only analog buttons on the PS5 controller
      Serial.print(F("\r\nL2: "));
      Serial.print(PS5.getAnalogButton(L2));
      Serial.print(F("\tR2: "));
      Serial.print(PS5.getAnalogButton(R2));
    }

    // Set the left trigger to resist at the right trigger's level
    static uint8_t oldR2Value = 0xFF;
    if (PS5.getAnalogButton(R2) != oldR2Value) {
      oldR2Value = PS5.getAnalogButton(R2);
      PS5.leftTrigger.setTriggerForce(oldR2Value, 255);
    }

    // Hold the PS button for 1 second to disconnect the controller
    // This prevents the controller from disconnecting when it is reconnected,
    // as the PS button is sent when it reconnects
    if (PS5.getButtonPress(PS)) {
      if (millis() - ps_timer > 1000)
        PS5.disconnect();
    } else
      ps_timer = millis();

    if (PS5.getButtonClick(PS))
      Serial.print(F("\r\nPS"));
    if (PS5.getButtonClick(TRIANGLE)) {
      Serial.print(F("\r\nTriangle"));
      PS5.setRumbleOn(RumbleLow);
    }
    if (PS5.getButtonClick(CIRCLE)) {
      Serial.print(F("\r\nCircle"));
      PS5.setRumbleOn(RumbleHigh);
    }
    if (PS5.getButtonClick(CROSS)) {
      Serial.print(F("\r\nCross"));

      // Set the player LEDs
      player_led_mask = (player_led_mask << 1) | 1;
      if (player_led_mask > 0x1F)
        player_led_mask = 0;
      PS5.setPlayerLed(player_led_mask); // The bottom 5 bits set player LEDs
    }
    if (PS5.getButtonClick(SQUARE)) {
      Serial.print(F("\r\nSquare"));
      PS5.setRumbleOff();
    }

    if (PS5.getButtonClick(UP)) {
      Serial.print(F("\r\nUp"));
      PS5.setLed(Red);
    } if (PS5.getButtonClick(RIGHT)) {
      Serial.print(F("\r\nRight"));
      PS5.setLed(Blue);
    } if (PS5.getButtonClick(DOWN)) {
      Serial.print(F("\r\nDown"));
      PS5.setLed(Yellow);
    } if (PS5.getButtonClick(LEFT)) {
      Serial.print(F("\r\nLeft"));
      PS5.setLed(Green);
    }

    if (PS5.getButtonClick(L1))
      Serial.print(F("\r\nL1"));
    if (PS5.getButtonClick(L3))
      Serial.print(F("\r\nL3"));
    if (PS5.getButtonClick(R1))
      Serial.print(F("\r\nR1"));
    if (PS5.getButtonClick(R3))
      Serial.print(F("\r\nR3"));

    if (PS5.getButtonClick(CREATE))
      Serial.print(F("\r\nCreate"));
    if (PS5.getButtonClick(OPTIONS)) {
      Serial.print(F("\r\nOptions"));
      printAngle = !printAngle;
    }
    if (PS5.getButtonClick(TOUCHPAD)) {
      Serial.print(F("\r\nTouchpad"));
      printTouch = !printTouch;
    }
    if (PS5.getButtonClick(MICROPHONE)) {
      Serial.print(F("\r\nMicrophone"));
      microphone_led = !microphone_led;
      PS5.setMicLed(microphone_led);
    }

    if (printAngle) { // Print angle calculated using the accelerometer only
      Serial.print(F("\r\nPitch: "));
      Serial.print(PS5.getAngle(Pitch));
      Serial.print(F("\tRoll: "));
      Serial.print(PS5.getAngle(Roll));
    }

    if (printTouch) { // Print the x, y coordinates of the touchpad
      if (PS5.isTouching(0) || PS5.isTouching(1)) // Print newline and carriage return if any of the fingers are touching the touchpad
        Serial.print(F("\r\n"));
      for (uint8_t i = 0; i < 2; i++) { // The touchpad track two fingers
        if (PS5.isTouching(i)) { // Print the position of the finger if it is touching the touchpad
          Serial.print(F("X")); Serial.print(i + 1); Serial.print(F(": "));
          Serial.print(PS5.getX(i));
          Serial.print(F("\tY")); Serial.print(i + 1); Serial.print(F(": "));
          Serial.print(PS5.getY(i));
          Serial.print(F("\t"));
        }
      }
    }
  }
}
4.書き込む
下のメニューにプログラムのビルドとアップロードボタンがあるので順番にポチポチ押してください。何かしらトラブルがあると進みません。

赤いマルで括った通りにsuccessと表示されればプログラムは書き込めました。ちなみにplatform ioの機能でポートをauto detectがあるのでいちいちポート選択しなくても大丈夫です。(この機能めっちゃ好き♡)
アップロードの隣のボタンにあるシリアルモニタを押してください。

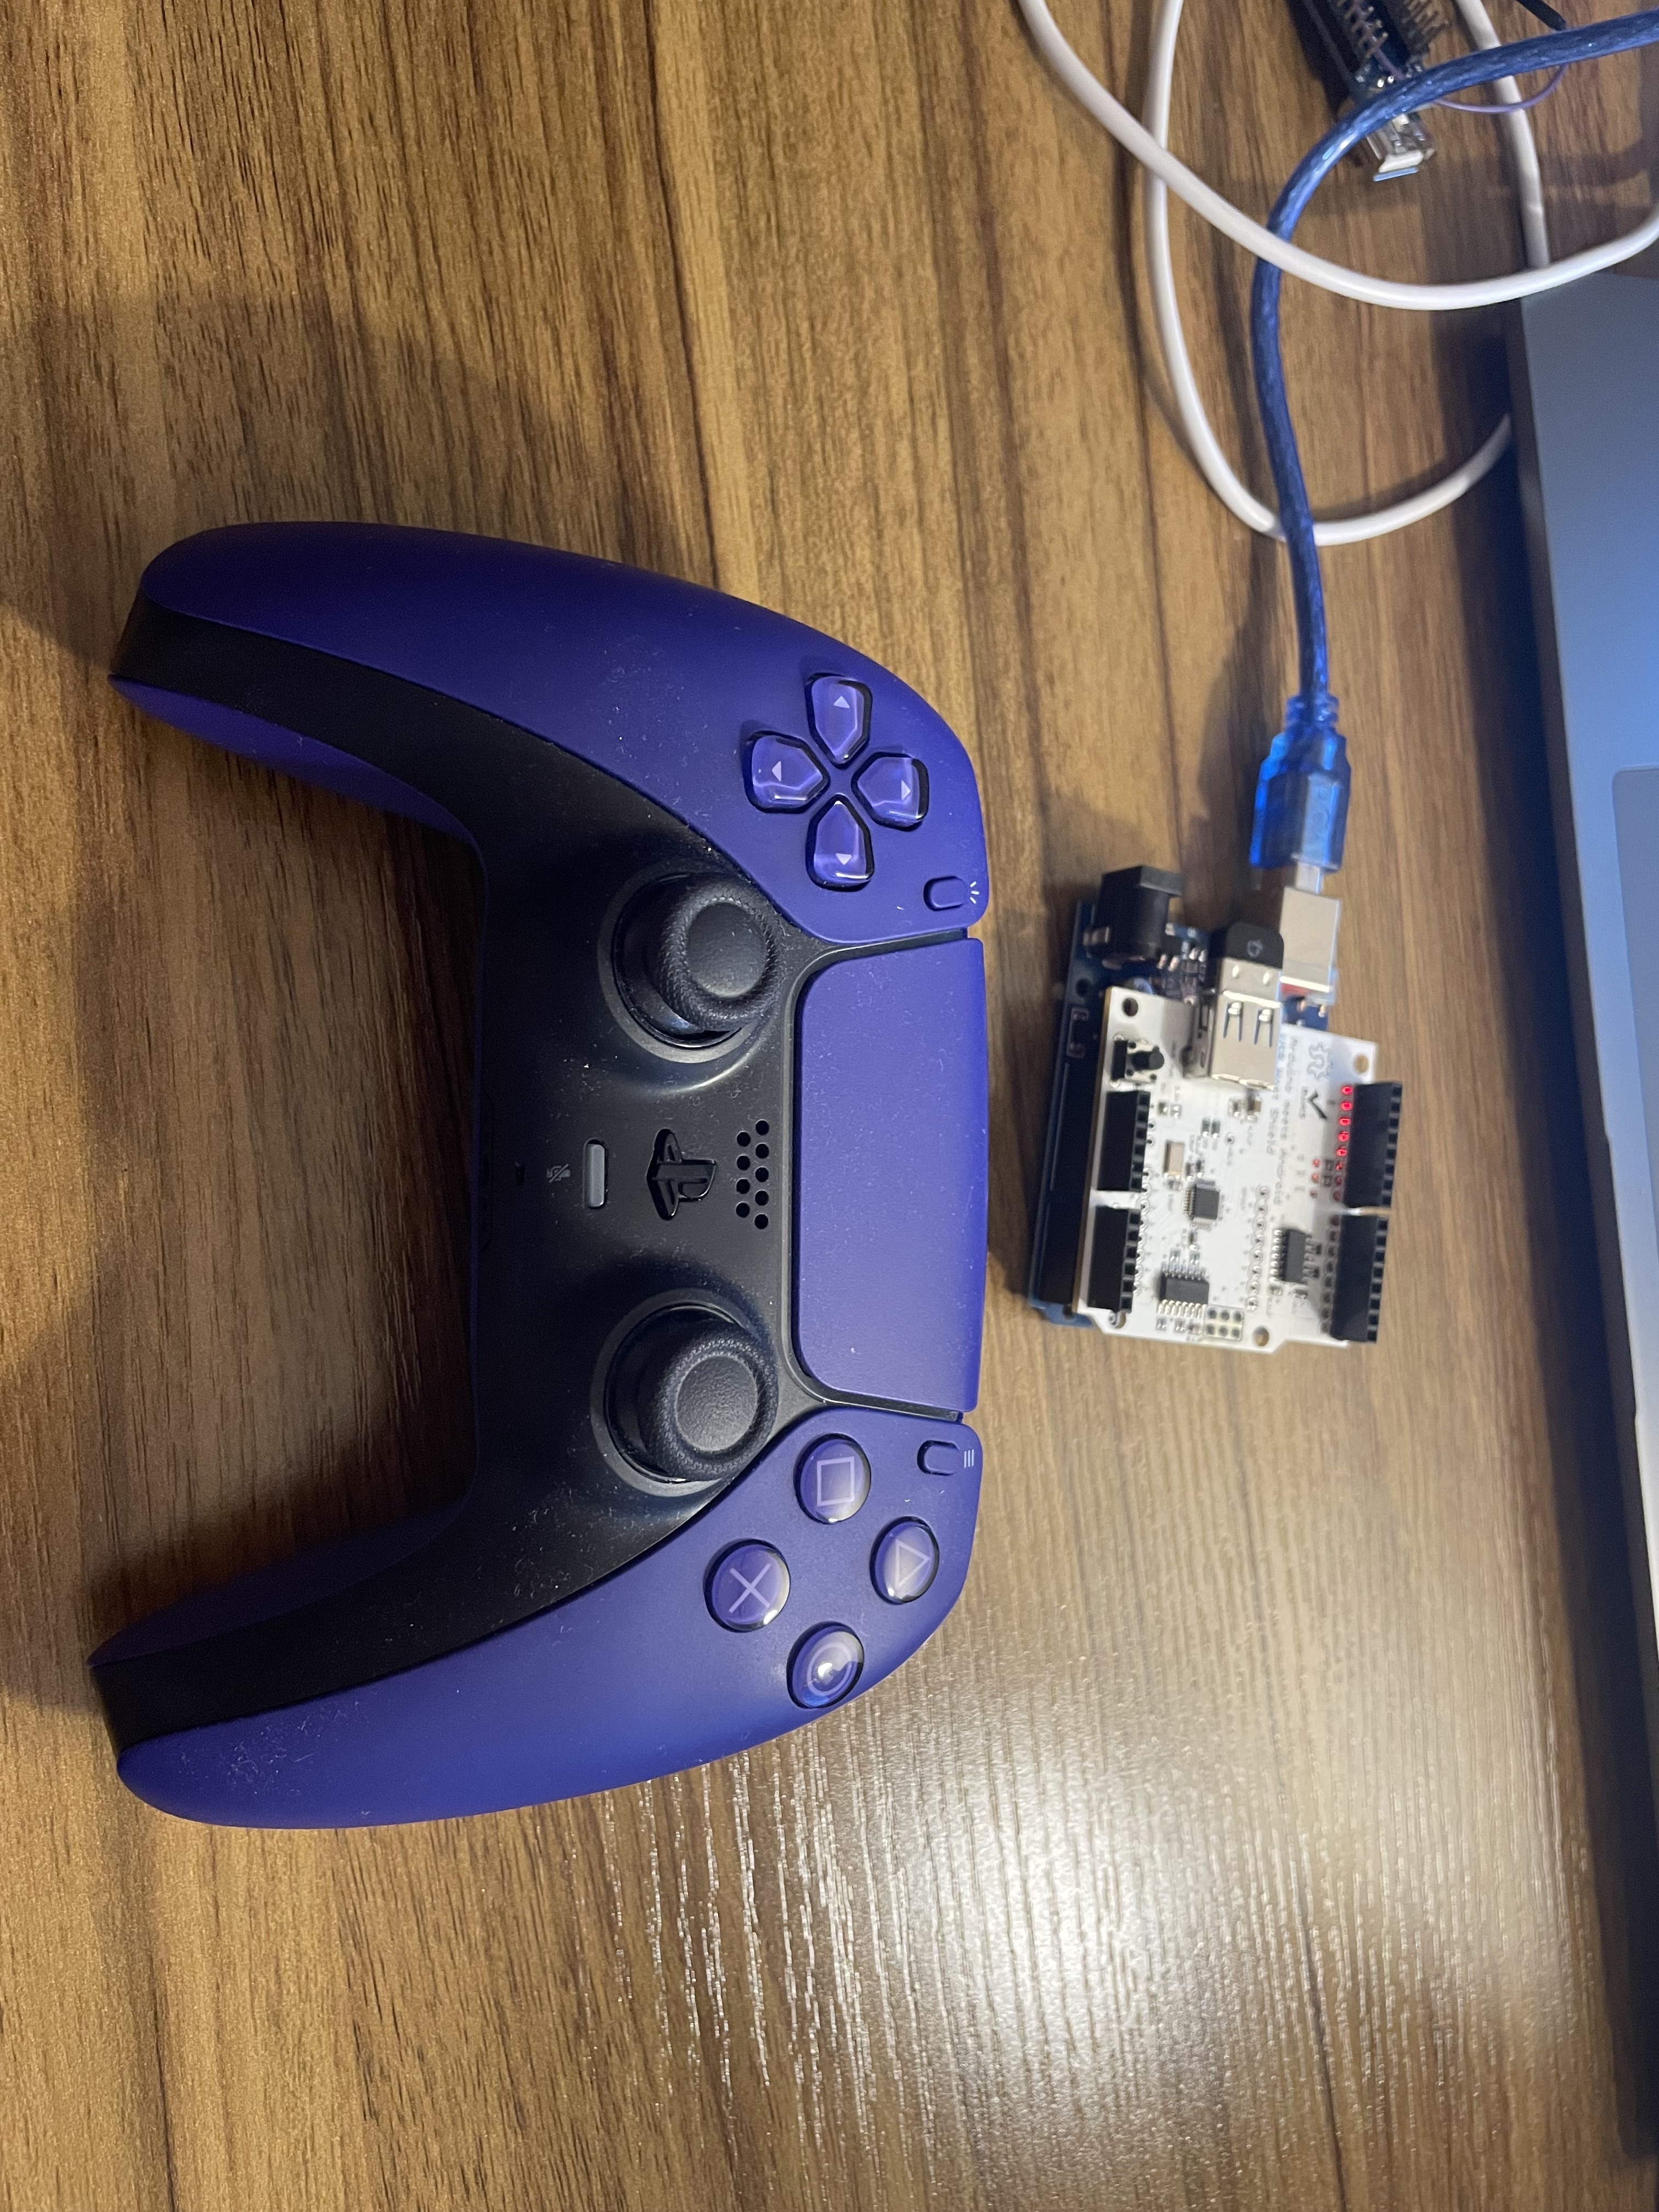
USB host shield基板とArduino、Bluetooth ドングルはこんな感じでつなげておいてください。
シリアルモニタを起動するとこのような画面が出て、ドングルのデータをArduinoが読みとってくれました。

あとはコントローラを起動させます。dual shock 5は赤丸の部分(「PSボタン」「SHAREボタン」)を同時に押して繋がるまで待つと勝手に接続されます。(dual shock4も同じ接続方法です。)

こんな感じで動いてくれたら成功です!
世の中で流通しているコントローラでロボット動かせたりすると結構テンションあがりますよね笑
ちなみに何年か前にこのUSB Host Shield 2.0ライブラリとwiiのバランスボードを使って重心移動で操縦できるロボット作りました。結構おもしろいですよね笑
参考サイト
ht-deko.com